To insert pictures to an article you must be an Author, Editor or Administrator. A Contributor do not have the privilege to insert pictures to an article and could request the help of Editor or Administrator to do so by providing the selected images.
An Author can insert pictures to his own article only, while an Editor and Administrator can upload for all.
To insert pictures, you should first have a good knowledge on how to post an article. You may refer to the step by step guide in the article “Posting An Article“.
There are two types of pictures that can be inserted:
1. Content pictures – These are pictures that go with the article and appear together with the text.
2. Feature image – These are image that will appear in the slide show at the homepage and will be shown as thumbnails when a category is selected. Feature images may be the same pictures used with the article picture or can be different. For feature images to appear in the slide show, make sure that the “Show” category is selected.
Here is a step by step guide to insert content pictures and setting the feature image.
Step 1
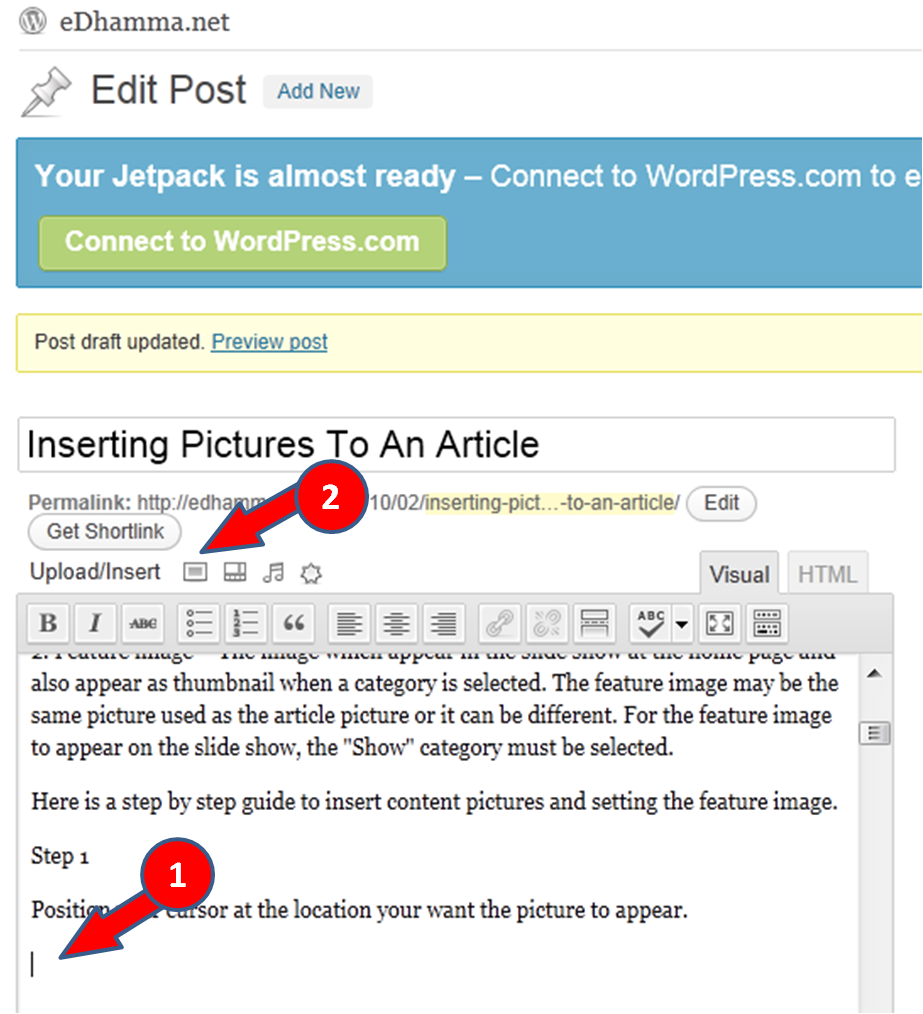
Position your cursor at the position you want the picture to appear.
Step 2
Above the content box, beside “Upload/Insert”, four icons are shown to simplify the process of inserting pictures, videos, audios or other medias into the article.
I will just describe the process of inserting pictures here as this is more commonly used and more complicated than the rest. Once you are proficient with inserting pictures, the rest should be a breeze.
Click on the “Add an Image” icon to bring up the picture admin page.
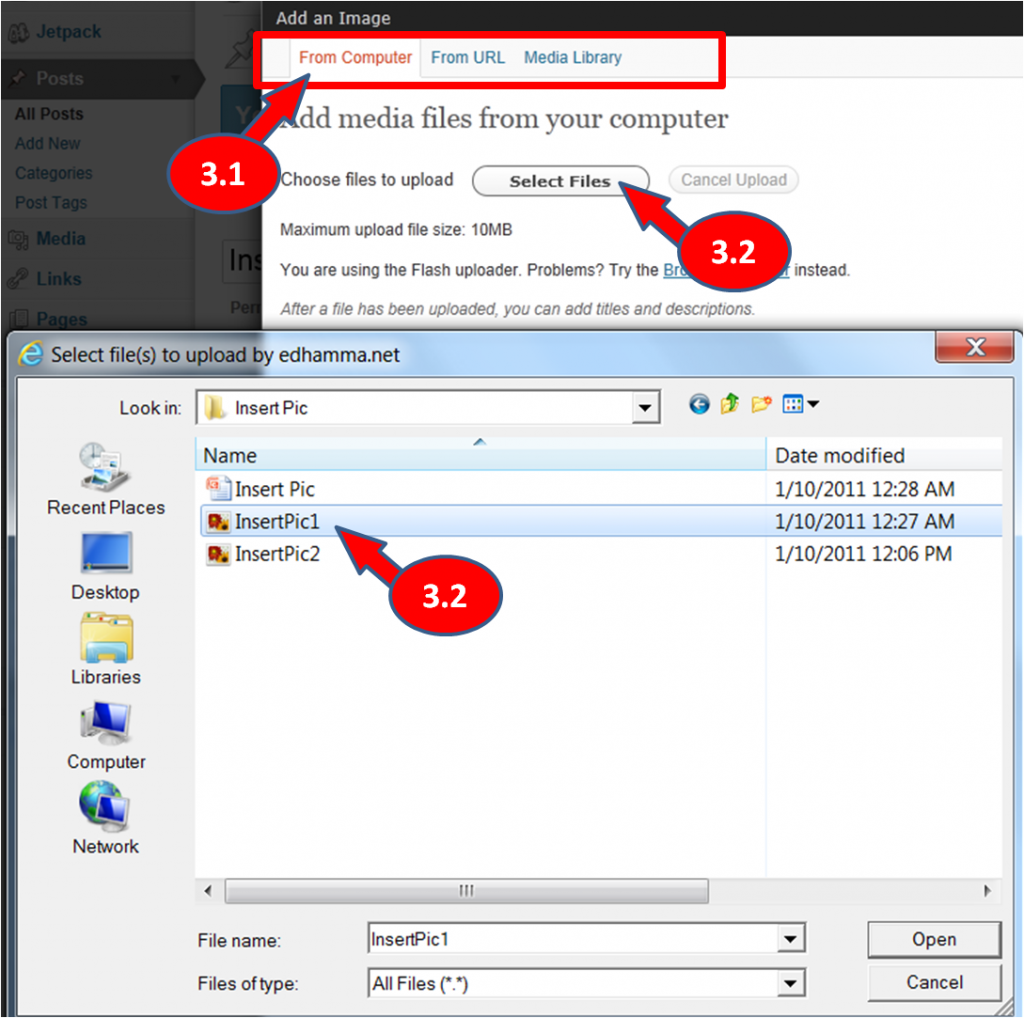
At the top of the picture admin page there are 3 tabs showing the 3 methods you can insert a picture, “From Computer”, “From URL” and “Media Library”.
You may choose from any one of the 3 methods whichever is feasible.
Selecting and inserting the picture …
Step 3 From Computer
This allows you to insert a new picture from your PC. You should adopt this method only when the other 2 methods are not feasible. This is because every time a new picture or file is uploaded, it takes up server space, and space means $$$.
Step 3.1 Ensure the “From Computer” Tab is selected.
Step 3.2 Click on “Select Files” and browse for the picture you want to insert. Double click on the picture file and the uploading process will start, i.e. transferring the picture into the server. Once done, the picture editing box will appear below.
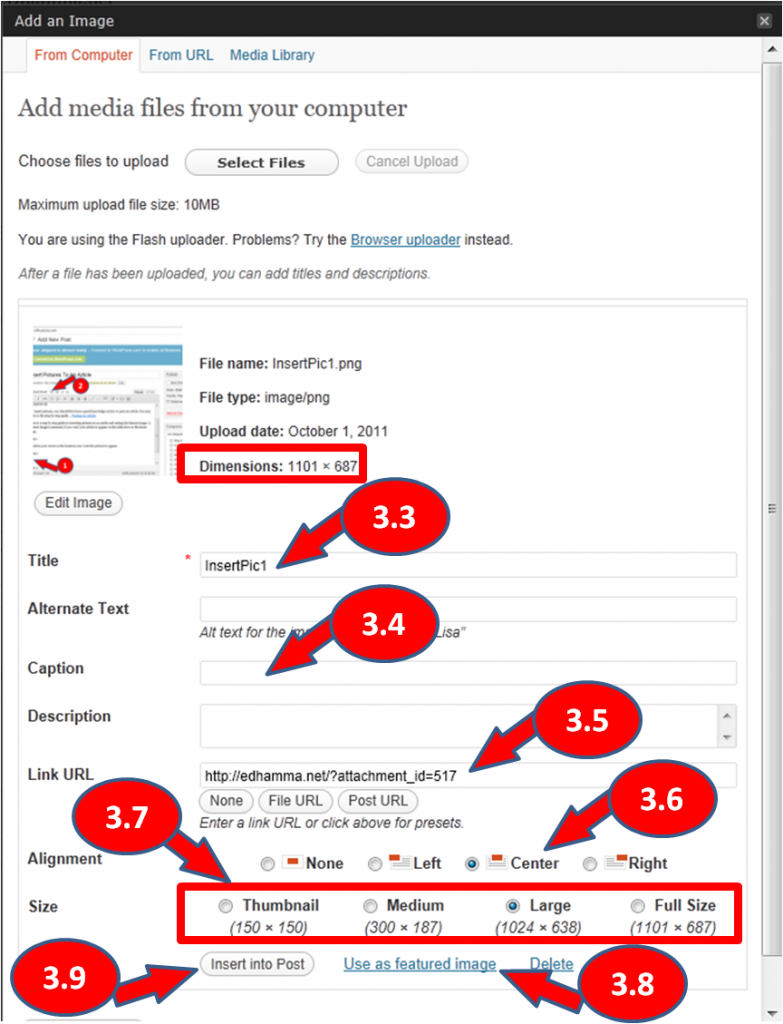
Step 3.3 Enter a title for the picture if desired. The title will appear when the reader hovers the cursor over the picture.
Step 3.4 Enter a “Caption” if you want to show text below the inserted picture.
Step 3.5 If you would like readers to be diverted to a certain website when they click on the picture, enter the website address at “Link URL”. By default it shows the picture address.
Step 3.6 Select the appropriate alignment – Left , Center or Right. If Center is selected, no text will appear at the sides of the picture. If Left or Right is selected, content text will appear at the sides of the picture.
Deciding on the size of the picture …
The size of the picture is referred to in pixel as Width X Height. The original size of the picture is shown as “Dimensions” and “Full Size”.
There are 4 size options for selection.
Bear in mind that the maximum width in the article box is 640 pixel and the maximum width in the home page slide show is 1024 pixel. So any image with an original size that is greater than 1024 pixel in width is deemed as unnecessary and occupying unnecessary server space. It would be wise to shrink the width to max 1024 with a photo editing software such as Paint or Photoshop before uploading. Better still, shrink it to max 640 if there is no intention of using it as a feature image.
Here are some situations you may want to take note; the rule is you shouldn’t resize a picture to bigger than its original size:
|
Original |
Resized |
Article |
Feature |
|
>1024 |
>1024 |
Image extends outside the box and partially covered |
Only middle portion of the image will be captured on show |
|
>1024 |
>640 |
Image extends outside the box and partially covered |
Only middle portion of the image will be captured on show |
|
>1024 |
<640 |
Image fits inside box |
Only middle portion of the image will be captured on show |
|
640 – 1024 |
640 – 1024 |
Image extends outside the box and partially covered |
Small image on show |
|
640-1024 |
<640 |
Image fits inside box |
Small image on show |
|
<640 |
<640 |
Image fits inside box |
Small image on show |
|
=1024 |
=640 |
Ideal, Image fits inside box from edge to edge |
Ideal, Image fits inside show from edge to edge |
Picture size can still be changed to other sizes after insertion. This will be described in step 6.
Step 3.7 Select the appropriate picture size from any of the 4 options.
Step 3.8 If the picture is intended to be use as feature image, click “Use as feature image” before inserting into post. Note that feature image on the slide show has an aspect ratio of 2.5 : 1 (Width : Height). If the height is too big, only the middle portion will be captured.
Step 3.9 Click “Insert into Post” to insert picture into the article. Don’t click if the picture is only to be used as feature image.
Setting feature image …
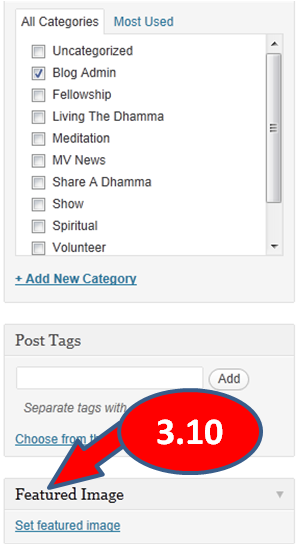
Step3.10 If you have not selected a feature image while inserting pictures into the article, it can be done separately by visiting the link “Set feature image” at bottom right.
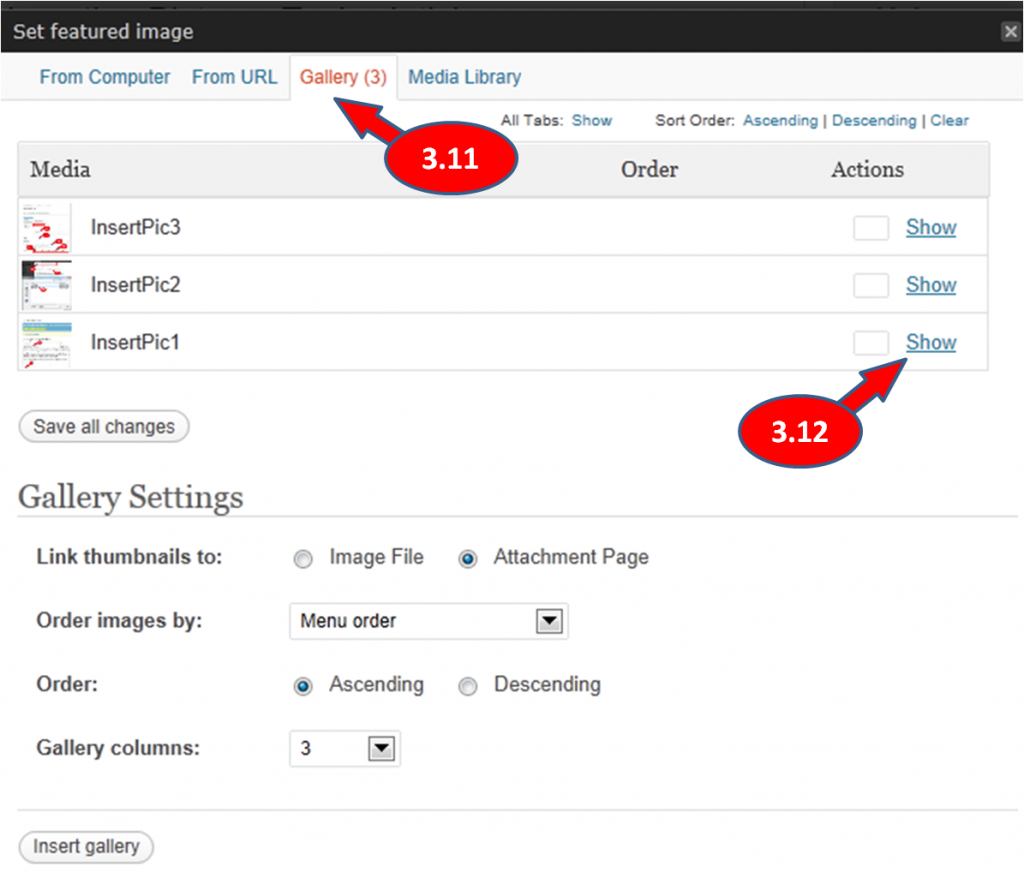
Step 3.11 You may select a feature image “From Computer”, “From URL”, “Gallery” or “Media Library”. Chances are you will find a feature image in “Gallery” because it will show only all the pictures you have uploaded for this particle article only.
Step 3.12 Identify the picture and click on “Show” to open up the picture editing page. Then follow steps 3.3 to 3.8 to set the feature image.
Step 4 From URL
URLs, or Uniform Resource Locators, are addresses on the World Wide Web to indicate the virtual location of a web site or document. All pictures on the internet have unique website addresses, or URLs. Knowing the URL of a picture allows us to enable the picture to appear in the articles without having to upload it into the blog server.
 Step 4.1 Select the “From URL” tab at the top.
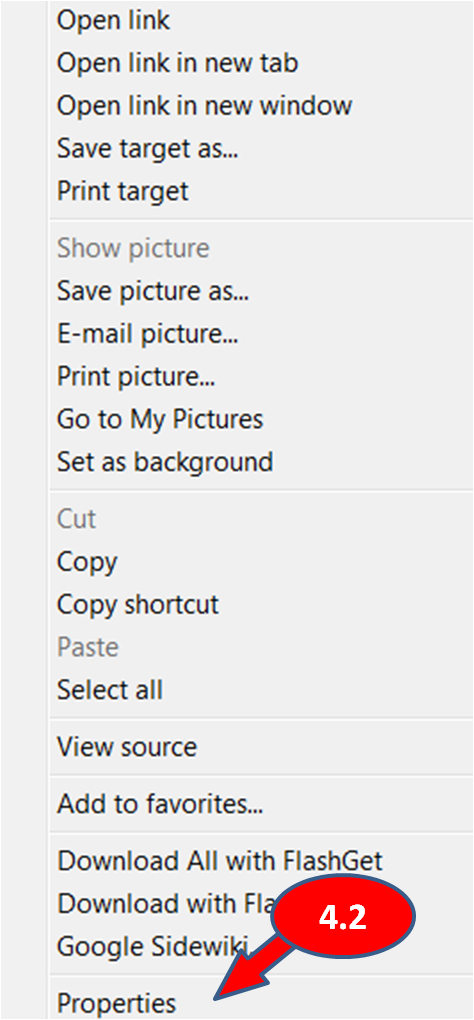
Step 4.2 Identify the URL of the picture you want to insert to your article. To do that, go to the picture on the website then do a right click on the picture to bring up a menu. Click on “Properties”.
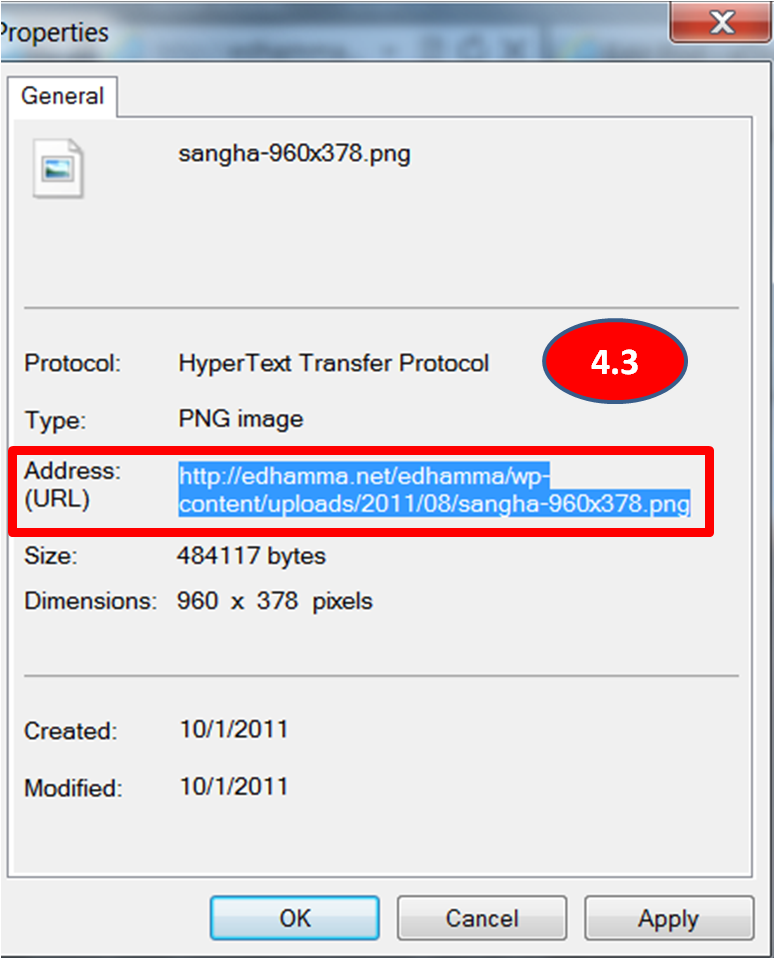
Step 4.3 Drag and copy the entire link from “Address (URL)” or simply triple click on the link and right click to copy.
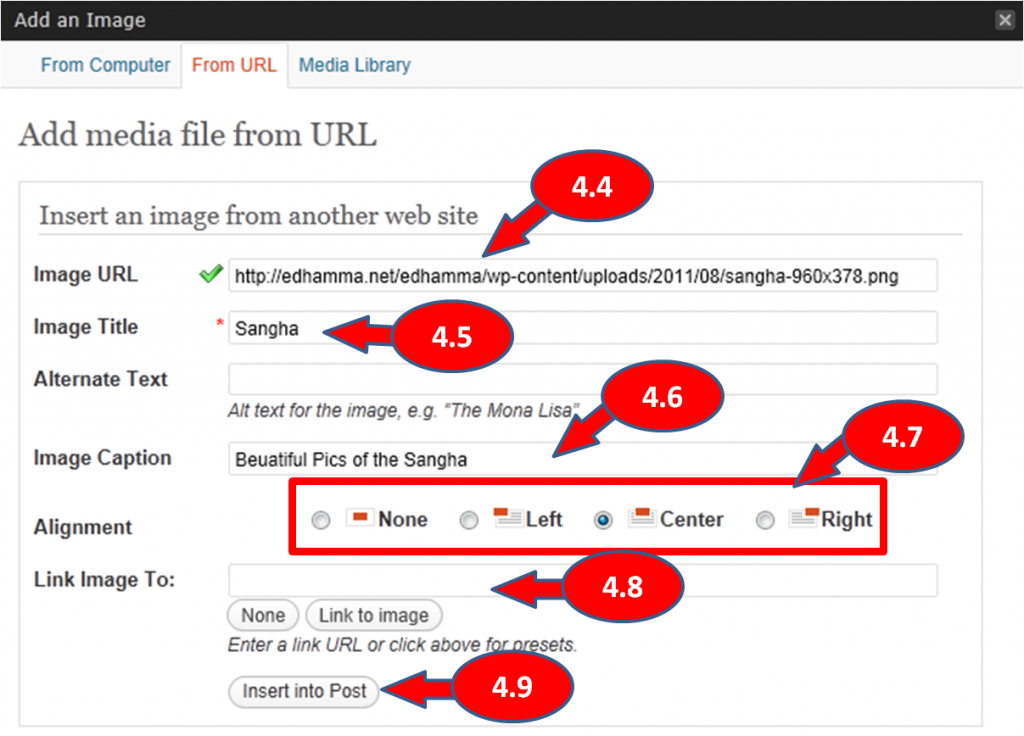
 Step 4.4 Paste the URL to the “Image URL” of the picture admin page.
Step 4.5 Enter a title for the picture if you wish. The title will appear when the mouse hovers over the picture.
Step 4.6 Enter an “Image Caption” if you want to show text below the inserted picture.
Step 4.7 Select the appropriate alignment Left , Center or Right.
Step 4.8 If you would like readers to be diverted to a certain website when they click on the picture, enter the website link at “Link Image To”.
Step 4.9 Click “Insert into Post”.
Step 5 From Media Library
The media library consists of all previously uploaded pictures so you can use them in your article without having to upload the same picture again, saving server space.
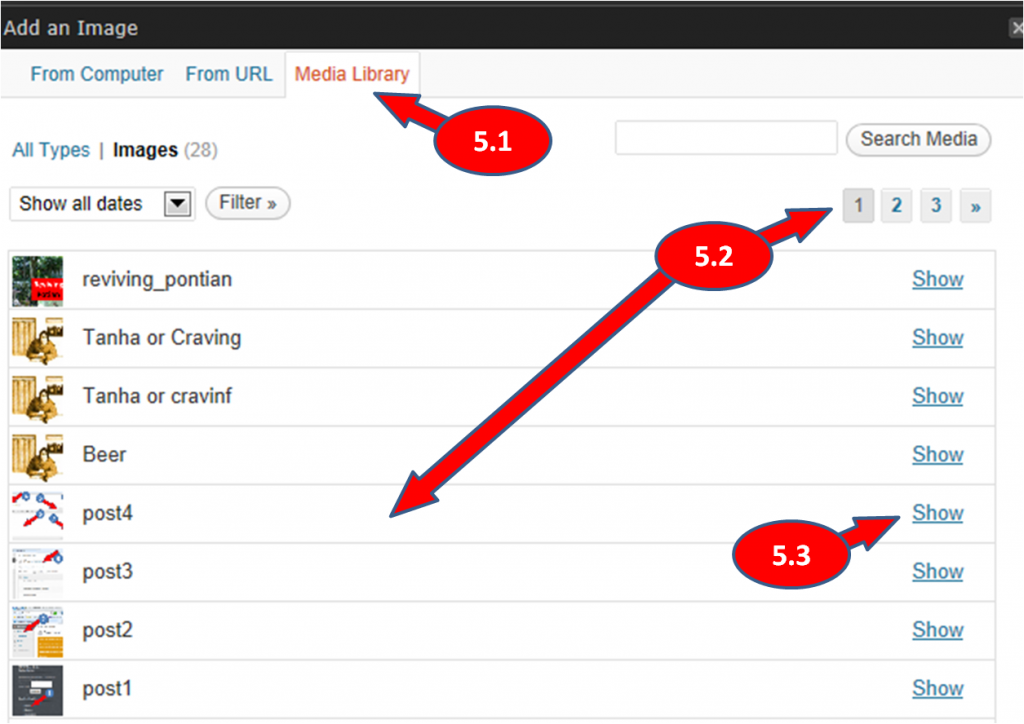
Step 5.1 Select the “Media Library” tab at the top.
Step 5.2 Browse through the media library pages to select the picture to insert.
Step 5.3 Click on “Show” to display the picture properties.
To insert pictures, refer to steps 3.3 to 3.10.
Step 6 Changing picture size after insertion
If you have inserted a picture with width larger than 640 pixel, the picture will extend outside the content box and will be covered partially by the side bar. Here are the steps to scale it down to exactly 640 pixel in width while maintaining the aspect ratio of the picture.
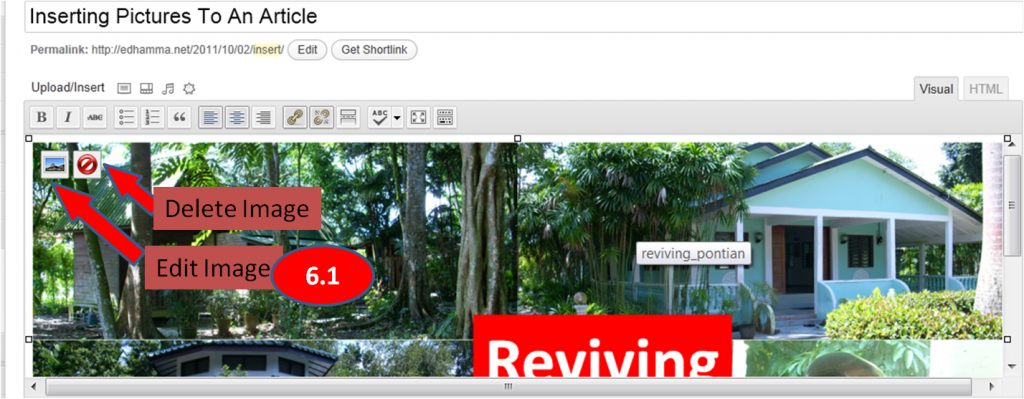
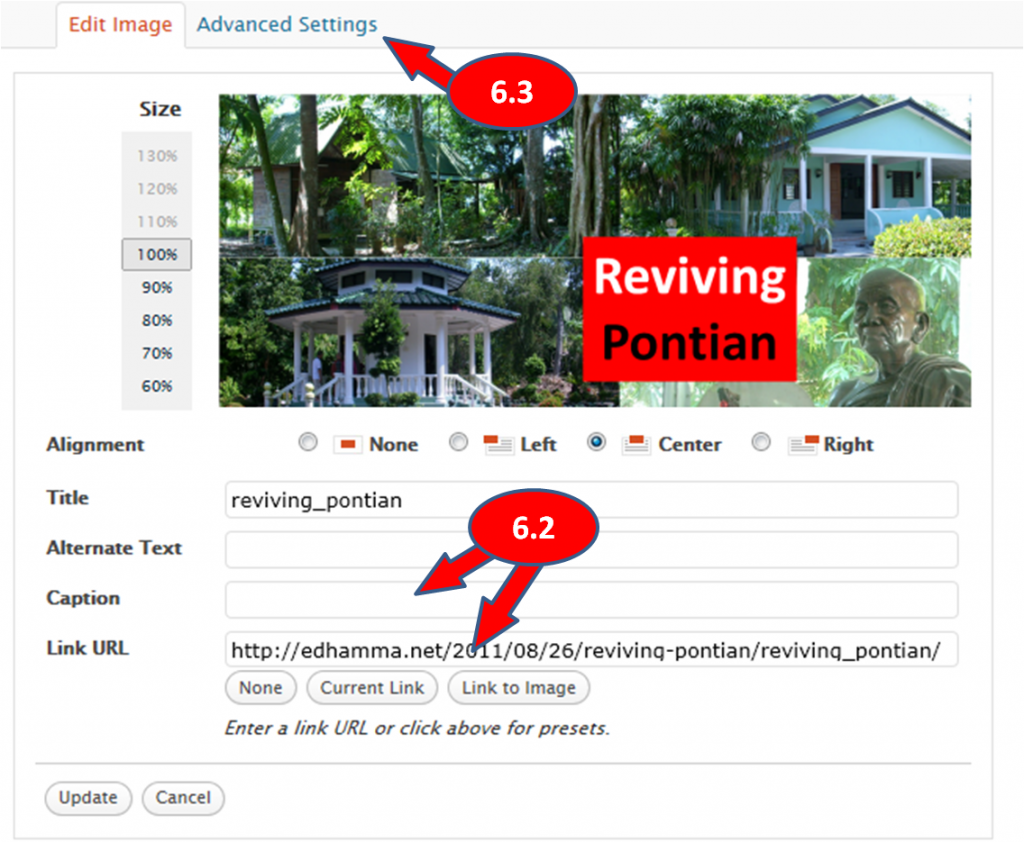
Step 6.1 Click anywhere on the picture your want to scale down. This will bring up 2 icons, “Edit Image” & “Delete Image”. Click on “Edit Image” icon. This will bring up the “Edit Image” window.
Step 6.2 You may change the Caption or Link URL if desired.
Step 6.3 Select the “Advance Settings” tab on the top. The current size of the image in Width & Height is shown.
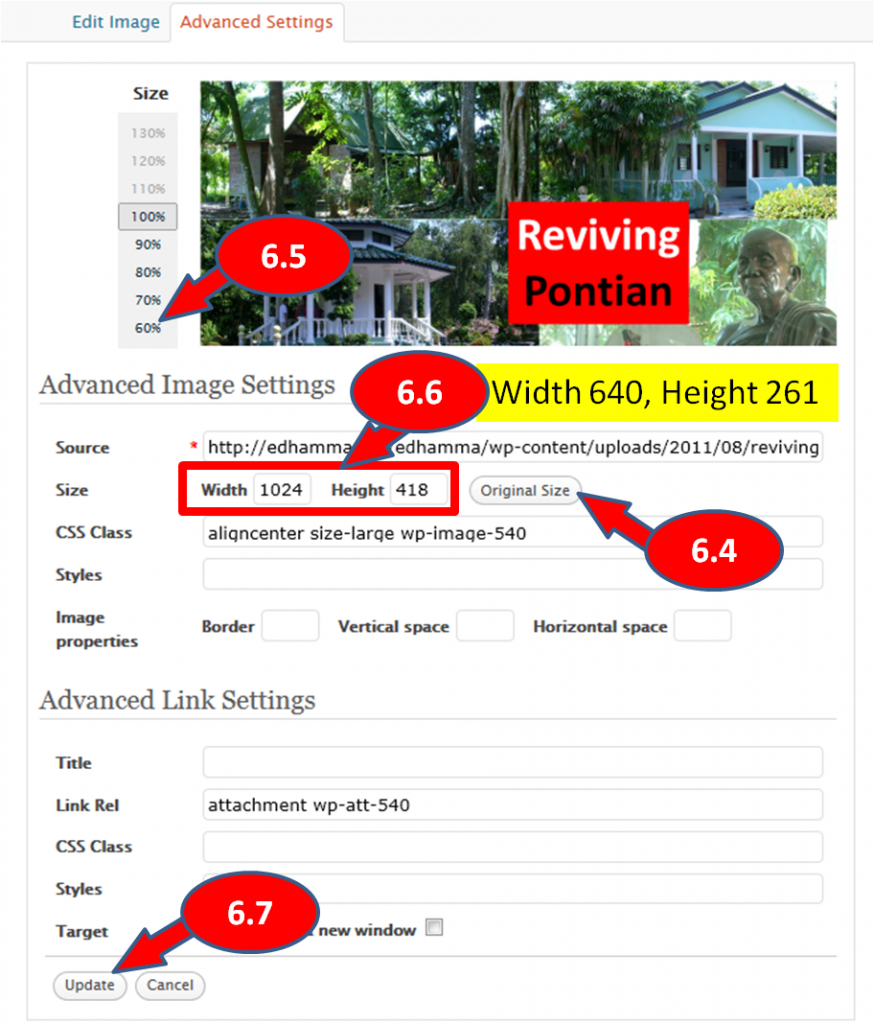
Step 6.4 Click on “Original Size” to show the original size of the image.
Step 6.5 As an example, the original width is 1024 and we want to scale it down to 640. That is 62.5% (640/1024) scale down of the original size. One simple way is to just select 60% on the picture scale and it will automatically scale it down to slightly less than 640, which is still OK.
Step 6.6 If you are a perfectionist and want it to be exactly 640, than change the width manually to 640 (62.5% of the original) and the height to 62.5% of the original height, which, in this example, is 418 X 62.5% = 261 (roundoff). This will fit the picture exactly within the content box from edge-to-edge.
Step 6.7 Click “Update” and the size in the article is changed as desired.
That’s it. Happy posting!


